Generating Azure Storage Tokens On the Fly With PowerShell

As I talked about in last week’s blog post, it’s important to ensure that files that you store in blob are secure from public eyes. But how do you allow your automation to access them when needed? That’s where a Shared Access Signature (SAS) token comes into play.

A SAS token is essentially an authorized URI that grants the person or object using it rights to access the object that you are otherwise concealing from the world. You can specify the amount of time that the URI is valid for; the protocol that is allowed; and the specific permissions to the object (read, write, delete). Once the time has elapsed, the URI is no longer valid and the object is not accessible.

Let me show you how this works!

After we’ve logged into Azure and set the appropriate subscription context, We need to get the resource group and storage account that our blob object lives in:

PS BlogScripts:> $StorageAccount = Get-AzureRmStorageAccount -ResourceGroupName 'nrdcfgstore' -Name 'nrdcfgstoreacct'

Once you’ve got your storage account, we can then acquire the storage account key, like we did in our last blog.


$StorageKey = (Get-AzureRmStorageAccountKey -ResourceGroupName $StorageAccount.ResourceGroupName -Name $StorageAccount.StorageAccountName)[0]

And then once we have our key, we can get the storage context and access our container:


$StorContext = New-AzureStorageContext -StorageAccountName $StorageAccount.StorageAccountName -StorageAccountKey $StorageKey.Value$Containers = Get-AzureStorageContainer -Context $StorContext -Name 'json'

And now we can get our object inside of the container:

 $TargetObject = (Get-AzureStorageBlob -Container $Containers.Name -Context $StorContext).where({$PSItem.Name -eq 'AzureDSCDeploy.json'})

And finally, we can get our SAS Token URI. Note, that I’m using HTTPSOnly for the protocol, r (Read-Only) for the permission, setting an immediate start time, and then limiting the time allowed for one hour with the ExpiryTime parameter. This ensures that the object will only be accessible for an hour after the command is run via HTTPS.


$SASToken = New-AzureStorageBlobSASToken -Container $Containers.Name -Blob $TargetObject.Name -Context $StorContext -Protocol 'HttpsOnly' -Permission r -StartTime (Get-Date) -ExpiryTime (Get-Date).AddHours(1) -FullUri

So by comparison, if I tried to access the direct URL of the object, this is what I’ll get:

However, with my SAS Token URL, I can successfully read the file:

And we’re done!

“So where is this useful in automation?” you may ask. Well I’ll be showing you exactly how next week when we take the code that we’ve built for the last couple of weeks and use it to deploy an Azure template via Azure automation.

See you then!

Managing Azure Blob Containers and Content with PowerShell

I do a lot of work in Azure with writing and testing ARM templates.  Oftentimes I deal with a lot of parameters that need to access resources existing in Azure.  Things such as Azure Automation Credentials, KeyVault objects, etc.  To streamline my testing process, I’ll often create an Azure runbook to run the deployment template, pulling in the necessary objects as they’re needed.

Of course, this requires putting the template in a place that’s secure, and that Azure Automation can easily get to it.  This means uploading my templates to a location, and then creating a secure method of access.  This week, I’ll show you how to do the former process – with the latter coming next week.  Then later on, I’ll be walking you through how to create a runbook to access these resources and do your own test deployments!

First, let’s log in to our AzureRM instance in PowerShell and select our target subscription.  Once we’re done, we’re going to get our target resource group to play with and the storage account.:

$Subscription = 'LastWordInNerd'
Add-AzureRmAccount
$SubscrObject = Get-AzureRmSubscription -SubscriptionName $Subscription
Set-AzureRmContext -SubscriptionObject $SubscrObject

$ResourceGroupName = 'nrdcfgstore'
$StorageAccountName = 'nrdcfgstoreacct'

$StorAcct = Get-AzureRmStorageAccount -ResourceGroupName $ResourceGroupName -Name $StorageAccountName
 Now that we have our storage account object, we’re going to retrieve the storage account key for use with the classic Azure storage commands.
$StorKey = (Get-AzureRmStorageAccountKey -ResourceGroupName $ModuleStor.ResourceGroupName -Name $ModuleStor.StorageAccountName).where({$PSItem.KeyName -eq 'key1'})

I know it’s not the most intuitive thing to think of, but if you take a look, there are currently no AzureRM cmdlets for accessing blob stores.  What we can do, however, is use the storage key that we’ve retrieved and pass it in to the appropriate Azure commands to get the storage context.  Here’s how:

Let’s go ahead and log in to our Azure classic instance and select the same target subscription.    Once you’re logged in, you can use the New-AzureStorageContext cmdlet and pass the storage key we just retrieved from AzureRM.  This allows us to use the AzureRM storage account in the ASM context.

Add-AzureAccount

$AzureSubscription = ((Get-AzureSubscription).where({$PSItem.SubscriptionName -eq $SubscrObject.Name}))
Select-AzureSubscription -SubscriptionName $AzureSubscription.SubscriptionName -Current

$StorContext = New-AzureStorageContext -StorageAccountName $StorAcct.StorageAccountName -StorageAccountKey $StorKey.Value
Now that we have a usable storage context, let’s create our blob store by using the New-AzureStorageContainer cmdlet with the -Context parameter to get at our storage account:
$ContainerName = 'json'
Try{

$Container=Get-AzureStorageContainer-Name $ContainerName-Context $StorContext-ErrorAction Stop

}

Catch [System.Exception]{

Write-Output ("The requested container doesn't exist. Creating container "+$ContainerName)

$Container=New-AzureStorageContainer-Name $ContainerName-Context $StorContext -Permission Off

}

I decided to write this as a Try/Catch statement so that if the container doesn’t exist, it will go ahead and create one for me.  It works great for implementations where I might be working with a new customer and I forget to configure the storage account to where I need it.  Also, if you notice, I’ve set the Public Access to Private by setting the Permission parameter to Off.  Once again, a little counter-intuitive.

Now, if our script created the blob, we’ll be able to look at the storage account in the portal we’ll see that our container is available:

But we’ve also captured the object on creation, which you can see here:

So now that we have our container, all we have to do is select our target and upload the file:

$FilesToUpload = Get-ChildItem -Path .\ -Filter *.json
ForEach ($File in $FilesToUpload){

Set-AzureStorageBlobContent-Context $StorContext-Container $Container.Name-File $File.FullName-Force -Verbose

}

And we get the following return:

Now that we’ve uploaded our JSON template to a blob store, we can use it in automation.  But first, we’ll need to be able to generate Shared Access Signature (SAS) Tokens on the fly for our automation to securely access the file.  Which is what we’ll be talking about next week!

You can find the script for this discussion on my GitHub.

Conceptualizing Objects In PowerShell

So during a break at the Metro Detroit PowerShell User Group‘s (#MetDetPSUG – thanks to @JMathews87 for thinking that one up!) second session of PowerShell Basics, I was having a discussion with my buddy Sean (@harperse) to help some of our members conceptualize how objects work and behave in the pipeline.

This, arguably, is one of the toughest concepts to teach someone who’s been working with ‘prayer-based parsing’ command line environments.  I myself had a hard time finding the switch in my mind to stop looking at just what was being handed to me on the screen, and realizing how an object and it’s properties change as it flows from one cmdlet to another.  But once that switch was flipped, PowerShell stopped being a basic scripting tool to me, and became something far more powerful.

So we came up with an analogy, and presented it to the class.  Once I was done presenting it, I could see the light bulbs going off in the room.  So I present it to you:

Pretend you're grabbing an apple from a bushel.  We'll call that Get-Apple.  
The apple we have is a tangible object.  This object, type: Apple, has properties.

-Color
-Texture
-Taste
-Shape

Just to name a few.  Now, the Apple object also has Methods:

-Eat
-Peel
-Slice
-Throw (That was Sean's idea.  I think he was implying something. :) )

So we take the Apple object and we run it through a press (Get-Apple | Press-Apple).  
The output object we get is Juice.  Now this new object may have some of the same 
property types as the original object, but the may have different values.  It may 
also have some new properties and methods as well.  For instance, you could use the 
method Drink with the object Juice, where you couldn't drink an Apple object.

So what do you think?  An appropriate analogy?  I’d love to hear some thoughts on this.

Holy Cow! I’m An Honorary Scripting Guy!

Honorary-Scripting-Guy_largeSo this happened today.

When Ed Wilson told me that I was going to become an Honorary Scripting Guy, I was absolutely floored.  For me, this is not just a career high, but a personal one as well.  One that I’ve dreamed of for almost a decade.

When I started my career in IT, and decided that living the hell that was help desk wasn’t for me, I decided that I wanted to be something better.  I picked up two books from Barnes and Noble that would effectively change my career.  The first was a book on Systems Management Server 2003 – the predecessor to System Center Configuration Manager.  The other, was Microsoft VBScript: Step by Step by none other than The Scripting Guy – Ed Wilson.

These two books set me on a career of configuration management, automation, and compliance.  Patch management was already a passion of mine (if you worked on a help desk in the Sasser/Slammer era, you’d understand), and fit in perfectly with the other three; driving me towards a career of Patch Management, Security Compliance, and Automation.  As times and technology changed, it was only logical that I did too.  PowerShell and cloud technologies like Azure would become my guiding star; My new passion.

I credit Don Jones’ and Jason Helmick’s passion to get into the community that drove me to start down the path that I’ve been on the last year and a half.  But it was Ed Wilson and Wally Mead that gave me direction to get to that point.

2015 was a roller-coaster for me.  Receiving the Microsoft MVP in PowerShell a fantastic and humbling achievement.  Then, at PowerShell Summit, I got to meet Ed Wilson for the first time.  He encouraged me to write some articles for ‘Hey, Scripting Guy!’.  Within a month, I had been given two of the highest honors that one could achieve in my line of work.  It was amazing!

Shortly after, a major personal event effectively derailed my involvement in the community as I struggled to refocus and right the ship.  I had to relocate, take on a new position, and start rebuilding.  Over the last couple of months, PowerShell and Azure have been not only my career focus, but my therapy as well.  I’ve always been big on puzzles and PowerShell and Azure have plenty of them to solve!

Teresa Wilson (@ScriptingWife and my adopted MVP mom!), and Sean Kearney (@energizedtech) have been instrumental in my revival with their kind words and guidance.  I felt renewed.  My writer’s block was lifted.  I was back in the game.  I could again share what I learned with the community.  Thanks to you both for your help.

Ed Wilson gave me the chance to give back in a big way; and when he referred to my series on DSC as ‘WAY COOL’ on The Scripting Guys Facebook page, I was again blown away.  Thank you, Ed, for again giving me an opportunity to give to the community.

I’m very fortunate to get to work with my career heroes on a regular basis.  Receiving an honor from one of them…well, words cannot describe how I feel.  I find myself again honored and humbled.

2016, look out!

PowerShell – Using Try Catch To Help With Decision Making In A Script

Recently, while working on my scripts for rolling out server deployments in Azure, I came across an interesting issue with a cmdlet throwing a terminating error when I wasn’t expecting one.

I was attempting to use the Get-AzureService cmdlet to verify if the cloud service that I specified already existed or not.  It was necessary to check its existence in case VMs had already been deployed to the service and we were adding machines to the pool.  If it didn’t exist, I would add script logic to create the cloud service before deploying the VMs.  So when I execute:

Get-AzureService -ServiceName 'LWINPRT'

Returns with the following terminating error:

TryCatch1

Now, I expected the service to not be there, because I haven’t created it, but I didn’t expect the cmdlet to terminate in a way that would stop the rest of the script from running.  Typically, when using a command to look for something, it doesn’t throw an error if it can’t find it.  For example, when I look to see if a VM exists in the service:

Get-AzureVM -ServiceName 'LWINPRT' -Name 'LWINPRT01'

I get the following return:

TryCatch2

While the error wasn’t expected, it’s certainly not a show-stopper.  We just have to rethink our approach.  So instead of a ForEach statement looking for a null-value, why don’t we instead look at leveraging Try-Catch?

The Try-Catch-Finally blocks are what allows you to catch .NET exception errors in PowerShell, and provide you with a means to alert the user and take a corrective action if needed.  You can read about them here, or there’s an exceptional article by Ashley McGlone on using it.   So we’ll go ahead and set this up to test.

    Try {
        Get-AzureService -ServiceName 'LWINPRT' -ErrorAction Stop 
        }#EndTry

    Catch [System.Exception]
        {
        Write-Host "An error occurred"
        }#EndCatch

And we execute…

TryCatch3

And we get a return!  But I don’t want an error in this case.  What I want is to create the cloud service if it doesn’t exist.  so let’s do this instead:

    Try {
        Get-AzureService -ServiceName 'LWINPRT' -ErrorAction Stop 
        }#EndTry

    Catch [System.Exception]
        {
        New-AzureService 'LWINPRT' -Location "West US"
        }#EndCatch

And we execute this…

TryCatch4

And now we get the service created.  And we can now see it in our Azure console:

TryCatch5

Now we can use this Try block to check if a cloud service exists or not, knowing that if it can’t find the cloud service it will throw a terminating error.  And when it does, we can use the Catch block to create the existing service.  Decision made.

PowerShell – Automating Server Builds In Azure – Pt. 3 – Finish And Function

Over the last couple of weeks, we’ve taken our simple Azure VM creation script and expanded its versatility to support standardization in an automated fashion.  Now  we’re going to add some finishing touches to make this a function that includes some scalability and added functionality before we turn our eyes towards the DSC portion of our role-based deployments.

Of course, because of some of the functionality that we’ll be adding in the script, we’re going to be jettisoning that easy stuff that was New-AzureQuickVM in favor of New-AzureVM.  New-AzureVM offers us a lot more flexibility to build our VMs, including the ability to statically assign an IP address during the configuration.  So to wrap up this portion of our Azure exploration, we’ll be:

  • Adding logic to verify that your Azure account token is valid.
  • Checking the predefined subnets’ address pools for available addresses and assigning them to the machine
  • Adding logic to deploy multiple VMs for a given role simultaneously.
  • Adding in our comment-based help and building our script into a function.

First step, let’s add in our comment-based help.  Aside from it being a community best-practice, it’s helpful to whomever you’re intending to use this script to understand what it is you’ve created and how it works.  So in it goes.

AzurePt3-1

We’ll go ahead and call this function New-AzureRoleDeployment.  Along with adding the block to set this as a function, we’re going to go ahead and leverage the Begin, Process, and End blocks as well.  The bulk of our previously existing script will reside in the Process block.  In the Begin block, I’m going to add some code to verify that there is an Azure Account configured for the PowerShell instance, and to execute the Add-AzureAccount cmdlet if no Azure account is signed in.  I’m using Get-AzureService to verify that the account’s authentication token is current, because Get-AzureAccount doesn’t readily give up that information.  Get-AzureService will throw an exception if it’s not current.

***NOTE*** – I was previously using Get-AzureSubscription, but found that this didn’t provide a consistent result.  I’ve updated the script to reflect the use of Get-AzureService instead.

    BEGIN {
        Write-Verbose "Verifying Azure account is logged in."
        Try{
            Get-AzureService -ErrorAction Stop
            }#EndTry

        Catch [System.Exception]{
            Add-AzureAccount
            }#EndCatch

    }#EndBEGIN

We’ll also add in a quick Write-Verbose message in the End block to state that the function finished.  We could omit the End block altogether, or use it to clean up our login with the Remove-AzureAccount cmdlet, but depending on how you’ve set up your Azure account on the system, you could wind up creating more work for yourself after running this function.  I’d recommend doing some reading up on how the Remove-AzureAccount cmdlet works before deciding if it’s something you want to add.

    END {

        Write-Verbose "New-Deployment tasks completed."

        }#EndEND

Now let’s do some modifications to the script to allow us to add a number of systems instead of a single system at a time.  This is going to require us to work with one of my favorite PowerShell features – math!  First, let’s update our parameter block with a Quantity parameter to input.

    Param (

        [Parameter(Mandatory=$True)]
        [ValidateSet('IIS','PSWA','PRT','DC')]
        [string]$Purpose,

        [Parameter(Mandatory=$True)]
        [int]$Quantity,

        [switch]$Availability

    )#End Param

Now, we’ll find our original code for creating the numbering portion of our server names.

$CountInstance = (Get-AzureVM -ServiceName $ConvServerName).where({$PSItem.InstanceName -like "*$ConvServerName*"}) | Measure-Object
$ServerNumber = ($CountInstance.Count + 1)
$NewServer = ($ConvServerName + ("{00:00}" -f $ServerNumber))
Write-Verbose "Server name $NewServer generated.  Executing VM creation."

We’re going to modify this code by changing the ServerNumber variable to FirstServer.  To make this easier, I use the Replace function in ISE (CTRL + H) to change all of the references to ServerNumber at once.  Next, we need to figure out the last server in the series.  Logically, you would think that this would just be the Quantity variable, plus the FirstServer.  However, this doesn’t work exactly as expected.  For example, if we:

$CountInstance = (Get-AzureVM -ServiceName 'LWINPRT').where({$PSItem.InstanceName -like "*LWINPRT*"}) | Measure-Object

We get a return of 0, because the cloud service doesn’t currently exist.  Now, so we don’t start at 0 or the highest allocated number for our server number series, we have to do this:

$FirstServer = ($CountInstance.Count + 1)

And if we execute our two lines of code, then the FirstServer variable will equal 1.  Now, we’ll go ahead and create a Quantity variable with the value of 3 and add the FirstServer and Quantity together.

$Quantity = 3
$LastServer = $FirstServer + ($Quantity)

Now, if we check the LastServer variable, we get a value of 4.  Now the problem comes up when we array it:

$Range = $FirstServer..$LastServer

We get the following array of values in the Range variable.

AzurePt3-4

So now, while we’ve requested 3 machines, our logic will tell PowerShell to build 4.  So we instead rectify it by subtracting a number from the Quantity like so:

            $CountInstance = (Get-AzureVM -ServiceName $ConvServerName).where({$PSItem.InstanceName -like "*$ConvServerName*"}) | Measure-Object
            $FirstServer = ($CountInstance.Count + 1)
            $LastServer = $FirstServer + ($Quantity - 1)
            $Range = $FirstServer..$LastServer

AzurePt3-5

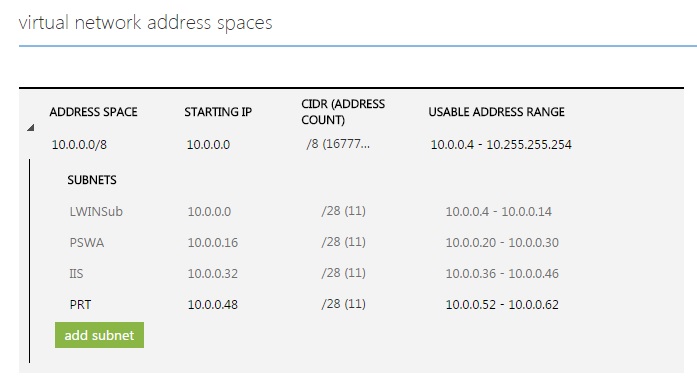
And now we have the appropriate range.  Next, we’re going to add a new switch block under our existing one to help set us up for assigning a static address in the subnet that the new systems will be assigned in.  So first let’s create the block with the output variable VNet:

            Switch ($Purpose){
            'IIS' {$VNet = '10.0.0.32'};
            'PSWA' {$VNet = '10.0.0.16'};
            'PRT' {$VNet = '10.0.0.48'};
            'DC' {$VNet = '10.0.0.64'}            

            }#Switch

Notice that I’m using the same purpose parameter.  No sense in requiring our user to enter information needlessly when we can pull it from a single source.

Because of how we need to craft our command to build a VM with the New-AzureVM cmdlet (you’ll see in a minute), we can no longer use a single argument list as before.  So instead we’re going to take what we had before…

                #Standard arguments to build the VM  
                $AzureArgs = @{

                    'ServiceName' = $ConvServerName
                    'Name' = $NewServer
                    'InstanceSize' = 'Basic_A1'
                    'SubnetNames' = $_Purpose
                    'VNetName' = 'LWINerd'
                    'ImageName' = $BaseImage.ImageName
                    'AdminUserName' = 'LWINAdmin'
                    'Password' = 'b0b$yerUncl3'
                }#EndAzureArgs

…and we’re going to update it like so:

           #Standard arguments to build the VM  
           $InstanceSize = 'Basic_A1'
           $VNetName = 'LWINerd'
           $ImageName = $BaseImage.ImageName
           $AdminUserName = 'LWINAdmin'
           $Password = 'b0b$yerUncl3'

Now we’re going to use our VNet switch to test the subnet, check the available addresses, and get the first one available to assign.  Also, I’m adding in some Write-Verbose statements so I can verify that the variables that I need to have created are actually being generated by my script.

      $AvailableIP = Test-AzureStaticVNetIP -VNetName $VNetName -IPAddress $VNet
      $IPAddress = $AvailableIP.AvailableAddresses | Select-Object -First 1

      Write-Verbose "Subnet is $VNet"
      Write-Verbose "Image used will be $ImageName"
      Write-Verbose "IPAddress will be $IPAddress"

As before, we’re going to use the presence of the Availability parameter to determine our path here.  The biggest change will be with our actual creation command.  Instead of a quick one-liner, we’ll instead be moving through the pipe, creating a new VM configuration object, adding the necessary information, assigning the static IP, and finally kicking off the build.

If($Availability.IsPresent){
                    
Write-Verbose "Availability set requested.  Building VM with availability set configured."
                    
Try{
    Write-Verbose "Verifying if server name $NewServer exists in service $ConvServerName"
    $AzureService = Get-AzureVM -ServiceName $ConvServerName -Name $NewServer
        If (($AzureService.InstanceName) -ne $NewServer){

            New-AzureVMConfig -Name $NewServer -InstanceSize $InstanceSize -ImageName $ImageName -AvailabilitySetName $ConvServerName | 
            Add-AzureProvisioningConfig -Windows -AdminUsername $AdminUserName -Password $Password | 
            Set-AzureSubnet -SubnetNames $_Purpose | 
            Set-AzureStaticVNetIP -IPAddress $IPAddress | 
            New-AzureVM -ServiceName $ConvServerName -VNetName $VNetName
        }#EndIf

        Else {Write-Output "$NewServer already exists in the Azure service $ConvServerName"
                
        }#EndElse

}#EndTry

Catch [System.Exception]{$ErrorMsg = $Error | Select-Object -First 1
    Write-Verbose "VM Creation failed.  The error was $ErrorMsg"
}#EndCatch

}#EndIf

The process is repeated for the Else statement in the event that the Availability parameter is not selected.

Else{
                    
        Write-Verbose "No availability set requested.  Building VM."
                    
    Try{
                        
        Write-Verbose "Verifying if server name $NewServer exists in service $ConvServerName"
                        
        $AzureService = Get-AzureVM -ServiceName $ConvServerName -Name $NewServer
        If (($AzureService.InstanceName) -ne $NewServer){
            New-AzureVMConfig -Name $NewServer -InstanceSize $InstanceSize -ImageName $ImageName | 
            Add-AzureProvisioningConfig -Windows -AdminUsername $AdminUserName -Password $Password | 
            Set-AzureSubnet -SubnetNames $_Purpose | 
            Set-AzureStaticVNetIP -IPAddress $IPAddress | 
            New-AzureVM -ServiceName $ConvServerName -VNetName $VNetName
        }#EndIf

        Else {Write-Output "$NewServer already exists in the Azure service $ConvServerName"
        }#EndElse

    }#EndTry

    Catch [System.Exception]{$ErrorMsg = $Error | Select-Object -First 1
                                Write-Verbose "VM Creation failed.  The error was $ErrorMsg"
    }#EndCatch

}#EndElse

Now we’ll go ahead and execute our new code to create three new VMs destined to be print servers.

New-AzureRoleDeployment -Purpose PRT -Quantity 3 -Availability -Verbose

AzurePt3-6

Success!  Now we can deploy any number of servers to our designated subnets, configure them with a statically assigned IP Address, and assign them to an availability group off of a simple one-liner!  Now I’m off to do some more reading and research on Desired State Configuration so we can continue our automated deployment track!

You can download the full script at the TechNet Script Center for review.

PowerShell – Automating Server Builds In Azure – Pt. 2 – Rolling Servers To Their Silos

During this scripting session, I’ll be working on a system that is running PowerShell 5.0 (February 2015 release).

So now that I’ve put together a basic script for building out a server in Azure, I want to do even more by making the script and my environment more versatile.  So we’re going to go ahead and add some parameterization that will build a naming standard for the hostname and cloud service, as well as give our script the ability to deploy the server into a preconfigured VLAN.

Ultimately, my goal will be to deploy a system and apply a DSC configuration using a single script that will configure the system using standardized settings based on the role that I’ve selected initially.  But let’s concentrate on the basics first.

You might have noticed, using the previous script, that there are some things that are configured (or not) with your Azure server.  For example, the VM is built as a Standard A1 Standard system (1 core, 1.75 GB RAM).  It also deposits the machine in your root network instead of any subnets you may have configured.  We’re going to remedy that today.

Before I start with updating my script, I’m creating some virtual networks in my Azure environment to assign systems to.  At the time of this writing, handling this in my PowerShell script requires a little more work than what I’d like to do, so I’m creating my virtual networks through the Azure UI.  These newly created subnets will use a naming convention that will be recognizable to my script with minimal work.

Azure2-6

Now on to the scripting!  First, I’m going to create a parameterization for the server role.  This will be the core variable that will determine a number of settings for us.  Second, I’m going to create a switch for creating an availability group (more on this later).  I’m also adding the cmdletbinding function for use later.

[cmdletbinding()]
Param (

    [Parameter(Mandatory=$True)]
    [ValidateSet('IIS','PSWA','PRT')]
    [string]$Purpose,

    [switch]$Availability

)#End Param

Now I’m going to create the switch to work with my Purpose parameter.  The purpose of this switch will be to determine the future role of the server, its naming convention, what subnet to add the system to, as well as the DSC configuration to apply to it at a later time.  So basically, everything.

Switch ($Purpose){
    'IIS' {$_Purpose = 'IIS'};
    'PSWA' {$_Purpose = 'PSWA'};
    'PRT' {$_Purpose = 'PRT'}
    }#Switch

Now we’ll also add our standardized naming prefix, set up our server naming, and the default Azure location we want to use.

$RootName = "LWIN"
$ConvServerName = ($RootName + $_Purpose)
$Location = "West US"

So when our script executes and we specify the PSWA parameter, we’ll get this:

Azure2-1

And I’m also going to add some Write-Verbose data here for troubleshooting purposes if anything goes south later on.

Write-Verbose "Environment is $_Purpose"
Write-Verbose "Root name is $RootName"
Write-Verbose "Service will be $ConvServerName"
Write-Verbose "Datacenter location will be $Location"
If($Availability.IsPresent){Write-Verbose "Server will be assigned to $ConvServerName availability group."}

Since I’m building a fairly basic environment for now, I’m going to silo things by server role.  But before we deploy the machine, we’re going to check to see if a cloud service exists, and if not, create it using our $ConvServerName label.  For some reason, if you attempt to retrieve a service name that doesn’t exist, Azure throws a terminating error.  So we’re going to handle this with a Try/Catch statement, and leverage that to create the cloud service if it runs into this error.

Try 
    {Write-Verbose "Checking to see if cloud service $ConvServerName exists."
    Get-AzureService -ServiceName $ConvServerName -ErrorAction Stop 
    }#EndTry

Catch [System.Exception]
    {Write-Verbose "Cloud service $ConvServerName does not exist.  Creating new cloud service."
    New-AzureService $ConvServerName -Location $Location
    }#EndCatch

Now that we’ve created the cloud service, we’ll go ahead and create the host name that we’ll be using.  Since I’ll be rolling out servers in numerical order, I’m going to add some logic in to count the number of existing servers in the cloud service (if any) and create the next instance based on count.

$CountInstance = (Get-AzureVM -ServiceName $ConvServerName).where({$PSItem.InstanceName -like "*$ConvServerName*"}) | Measure-Object
$ServerNumber = ($CountInstance.Count + 1)
$NewServer = ($ConvServerName + ("{00:00}" -f $ServerNumber))
Write-Verbose "Server name $NewServer generated.  Executing VM creation."

So let’s add in our arguments table from last week and our boot image location.  We’re making some modifications over last week’s script to accomodate for some of the automation we’re performing.  We’re specifying the Basic_A1 instance size, as well as assigning the machine to a pre-configured subnet, and using our $ConvServerName variable to determine the service to put the machine into.

$BaseImage = (Get-AzureVMImage).where({$PSItem.Label -like "*Windows Server 2012 R2 Datacenter*" -and $PSItem.PublishedDate -eq "2/11/2015 8:00:00 AM" })

$AzureArgs = @{

    'ServiceName' = $ConvServerName
    'Name' = $NewServer
    'InstanceSize' = 'Basic_A1'
    'SubnetNames' = $_Purpose
    'VNetName' = 'LWIN.Azure'
    'ImageName' = $BaseImage.ImageName
    'AdminUserName' = 'LWINAdmin'
    'Password' = 'b0b$yerUncl3'
}

Now for our VM creation, we’re going to add some logic in to verify whether or not the machine already exists in the service (just in case!), and add a little error handling in case things get a little ugly.  We’ll also wrap this in an If statement for handling the build with and without the availability parameter selected.

If($Availability.IsPresent){
    Write-Verbose "Availability set requested.  Building VM with availability set configured."
    Try{
        Write-Verbose "Verifying if server name $NewServer exists in service $ConvServerName"
        $AzureService = Get-AzureVM -ServiceName $ConvServerName -Name $NewServer
            If (($AzureService.InstanceName) -ne $NewServer){
                New-AzureQuickVM -Windows @AzureArgs -AvailabilitySetName $ConvServerName
            }#EndIf
            Else {Write-Output "$NewServer already exists in the Azure service $ConvServerName"}#EndElse
        }
    Catch [System.Exception]{$ErrorMsg = $Error | Select-Object -First 1
                                Write-Verbose "VM Creation failed.  The error was $ErrorMsg"}#EndCatch
}#EndIf
Else{
        Write-Verbose "No availability set requested.  Building VM."
    Try{
        Write-Verbose "Verifying if server name $NewServer exists in service $ConvServerName"
        $AzureService = Get-AzureVM -ServiceName $ConvServerName -Name $NewServer
            If (($AzureService.InstanceName) -ne $NewServer){
                New-AzureQuickVM -Windows @AzureArgs
            }#EndIf
            Else {Write-Output "$NewServer already exists in the Azure service $ConvServerName"}#EndElse
        }
    Catch [System.Exception]{$ErrorMsg = $Error | Select-Object -First 1
                                Write-Verbose "VM Creation failed.  The error was $ErrorMsg"}#EndCatch
}#EndIf

So now we’ll go ahead and save our script and execute…

.\ServerDepl.ps1 -Purpose IIS -Availability -Verbose

Pt2PicA

And success!  So let’s check and verify that we have our service:

Pt2PicB

And that we have our VM.

Pt2PicC

And now we can check our VM config and verify that we have an availability group and the correct network.

Pt2PicD

Tada!

Next week I’ll be putting some of the finishing touches on this script to make it a bit more versatile.  And hopefully in the following week after that, I’ll be able to show off a little of what I’ve learned of DSC before heading out to the PowerShell Summit this April.  Stay tuned!

PowerShell Debate: Write-Verbose As Opposed To Writing Comments

Recently, I was working out some problems in my script that I’m developing in my Azure environment, and a thought had occurred to me while I was working: Is commenting in my scripts a waste of time?

WriteVerbose2

While I was building my script, I was actually using a lot of Write-Verbose messages so that way I could monitor the commands as they executed by using the -Verbose parameter.  This was especially helpful in my If/Else statements, or my Try/Catch statements, so I could monitor what patch my script was heading down to make sure it was doing what it was supposed to do.  I also added some extra bits here and there to make sure that my variables were generating as I expected them to.  Very quickly I found that I was actually duplicating the work I was putting into commenting my code with my Write-Verbose statements.  This is what lead me to my to the thought that perhaps comments aren’t really the way to go.

If you’ve coded a robust function, there should almost never be a time when an admin has to dig into your scripts.  This means that the only time someone is ever going to look at it, is when something goes wrong.  Instead of tearing through your code and figuring out at what point things fall apart, you could far more quickly and easily execute the script with -Verbose, and see the last command executed before everything hit the fan.  After all, if it’s a script that has worked well for a long time, it’s more likely that something changed in your environment more so than the script just breaking for no good reason.

I still use commenting, but more really for my own sanity, such as tracking which curly bracket is closing which statement, and of course when adding my Comment Based Help! But for the most part, I’m seeing less reason to use commenting over Write-Verbose, because of the usability that the latter supplies.  I’d actually like to hear what other people think about this.  Let me know in the comments below!

PowerShell – Automating Server Builds In Azure – Pt. 1 – Basic Builds

During this scripting session, I am working on a system that is running PowerShell 5.0 (February 2015 release).

I started with a very simple goal towards learning Azure and Desired State Configuration: to be able to rapidly deploy a series of machines required for giving demonstrations at user group meetings and internal company discussions.  In order to get my Azure environment to this point, I figured that I would need to learn the following:

  • Build a single deployment using a one-line command.
  • Build a series of constants to provide the one-line command to ensure consistency in my deployments.
  • Build a series of basic parameterized inputs to provide the command the necessary information to deploy the server into a service group for a given purpose (IIS server, print server, etc.)
  • Expand the scope of the script to build a specified number of servers into a service group, or add a number of servers to an existing service group.
  • Build a second command to tear down an environment cleanly when it is no longer required.

Once complete, I will stand up a DSC environment to explore the possibility of leveraging my provisioning scripts to deploy my standardized configurations to a number of different deployments based on the designated purpose.

Before I begin, it should be noted that I had an issue with the New-AzureQuickVM cmdlet returning an error regarding the CurrentStorageAccountName not being found.  A quick Googling took me to Stephen Owen’s blog on how to resolve this error.  You’ll want to read up on this post and update your Azure subscription info if necessary.  You’ll likely have to.

The ‘One-Liner’

Building a one-line command is pretty easy, provided that you have some necessary things configured before deploying.  For my purposes, I’ll be using the New-AzureQuickVM cmdlet.  At a bare minimum for a Windows deployment, you’ll need the following bits of information:

  • You need to specify that you want to deploy a Windows server. (-windows)
  • The location of your preferred Azure datacenter (-location)
  • The image name you wish to deploy. (-imagename)
  • The name of the server you wish to deploy.(-name)
  • The Azure Cloud Services name to deploy the server into. (-servicename)
  • The user name of the Administrator account. (-adminusername)
  • The password of the Administrator account. (-password)

But before we can do the assemblage, we need to gather some information first; such as the information for location and imagename.  Getting the location is fairly straightforward.  Using the Get-AzureLocation cmdlet, you can get a listing of the datacenters that are available globally.

Get-AzureLocation

Azure2

For our purposes, we’ll use the West US datacenter location.  Now to look up the image name, we’ll use the Get-AzureVMImage since we’re not using any custom images.

Get-AzureVMImage

Now you’ll find that when you run this, it’s going to pull all of the images available through Azure; 470 at the time of this writing to be exact!  So we’re going to try to pare this down a bit.

Azure3

(Get-AzureVMImage).where({$PSItem.Label -like "*Windows Server 2012 R2*"}) | Measure-Object

Azure4

Well, almost.  But if we whittle it down a bit further…

Azure5

Ah!  Better.  Now that we’ve gotten down to the base server load, we can take a look and we’ll find that, like the images available in the image gallery in the New Virtual Machine wizard in Azure, you have three different dated versions available to choose from.  For the purposes of our implementation, we’ll just grab the latest image.

Azure6

What we’ll be looking to grab from here is the long string of characters that is the image name to fulfill the image requirement for our command.  So let’s go ahead and snag this bit for our BaseImage variable and add our $Location variable as well.

$Location = 'West US'
$BaseImage = (Get-AzureVMImage).where({$PSItem.Label -like "*Windows Server 2012 R2 Datacenter*" -and $PSItem.PublishedDate -eq "2/11/2015 8:00:00 AM" })

So now we can build our command.  But I’d like to not have my commands run off the screen, so let’s do some splatting!

$Location = 'West US'
$BaseImage = (Get-AzureVMImage).where({$PSItem.Label -like "*Windows Server 2012 R2 Datacenter*" -and $PSItem.PublishedDate -eq "2/11/2015 8:00:00 AM" })
$AzureArgs = @{
 Windows = $True
 ServiceName = 'LWINerd'
 Name = 'TestSrv'
 ImageName = $BaseImage.ImageName
 Location = $Location
 AdminUserName = 'LWINAdmin'
 Password = 'b0b$y3rUncle'
}
New-AzureQuickVM @AzureArgs

And now we see that we have a new service in Azure…

Azure7

And a new VM is spinning up!

Azure8

And now we have our base script for building VMs in Azure.  Next post, we’ll be looking at creating availability sets through PowerShell, as well as assigning our VMs to specific virtual network address spaces, bringing in some parameterization and more!

***EDIT*** – For some reason I was previously under the impression that you have to create an availability set if you wanted to have multiple machines co-existing in the same cloud service.  This is not the case, but I’ll be exploring the creation of availability sets in my code next week nonetheless.

Exploring Azure and Desired State Configuration Through PowerShell

I’ve decided to test out the possibility of using an Azure environment for carrying the tools necessary for some of my presentations.  The goal is to build out an Azure server instance that stores a number of DSC configurations that I can use to spin up different environment scenarios on the fly.  It also gives me a good excuse to finally get heads-down and learn Azure and DSC.

The other side of the coin is to see if Azure itself can actually be utilized as an affordable alternative to building out a virtual lab at home.  So while my posts may have less code for the next few weeks, I’m hoping that all of the work will pay off in some creative coding that will include some examples of spinning up resources in Azure and then applying DSC templates to them for your digestion.

Azure

For the moment, I’m using a free trial of Azure, which is available by going here and signing up.  At the time of writing this, I was granted a 30-day trial with $200 in credits to use as I saw fit.

There’s a lot of good information out there regarding configuring your first Azure environment.  Here are some of the blogs and guides that I’m using, including some light reading for DSC.

Of course, as I’m new to Azure and DSC, I’ll be happy to have people point out any gaps or improvements I can make, so please feel free to comment!