I find that as I become more comfortable with my new skills as a PowerShell junkie, I enjoy answering questions more and more. Oftentimes, I find questions on various forums that challenge my knowledge and skill level to become even more adept at PowerShell. Recently, I came across a task that not only challenged my skills, but also reinforced the need to break away from certain habits and concepts that I’ve been using over the years with my scripts. This week’s lesson: Strings are not fixed data!
The challenge was an interesting one: You have a CSV file with a bunch of names. Some include First, Middle, and Last – some don’t. Retrieve the first letter of the first name and the entire last name to generate an email address.
Easy enough if your CSV consists of three columns. First we’ll use Import-CSV and see what we’ve got here.
Import-CSV 'C:\scripts\email.csv'

Ah. Looks like the file has no headers. Easy enough of a fix:
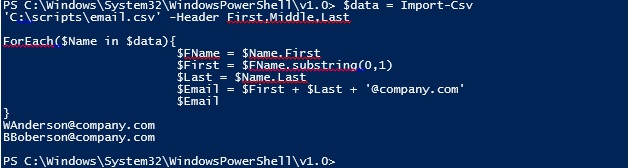
Import-Csv 'C:\scripts\email.csv' -Header First,Middle,Last
 Now that looks a lot better! So we’ve got our data. Let’s go ahead and break this thing down, starting with the first name.
$FName = $Name.First
This will return the names in the First column only. Now what we’ll do is use the substring method to extract the first character from the string. The two parameters after substring mark your starting point (which is 0, or before the first letter), and how many characters you want (which is the first one).
$First = $FName.substring(0,1)
So we’ll just run our script real quick here and…
There we go! Part one accomplished! The last name and email parts are pretty easy. Just add in these lines:
$Last = $Name.Last

$Email = $First + $Last + '@company.com'
And you get…
 And there you have it!
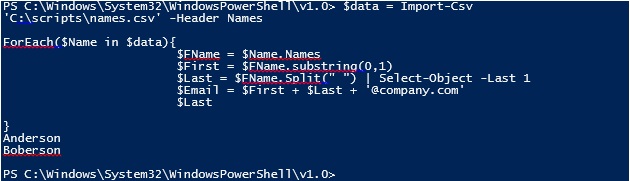
But what if the full names are in a single column only? Well, that’ll take a little bit different of an approach. Fortunately, it doesn’t involve completely scrapping the script. For the first initial, you can still use the substring method to grab it, but you need an easy way to identify the last name. So let’s split the incoming data on the spaces:
$Last = $FName.Split(" ")
And we’ll get this return:
 Now I started thinking, “Well that’s great! But how do I tell PowerShell which one is which!?” It took a little time, but I remembered that with PowerShell, we’re moving objects through the pipe, not fixed data. And like any other object, I can filter them!
$Last = $FName.Split(" ") | Select-Object -Last 1
And voila!
 Now you might decide, “you know, I think I’d like to have the middle name in there. How are you going to do that, huh!?” Well, I’ll show you. Just:
$Middle = $FName.Split(" ") | Select-Object -First 2 | Select-Object -Last 1

Oh, but look. Some of the strings have a middle name instead of just an initial. We can easily remedy this by feeding our filtered object into a substring like we did with the first name:
$Middle = ($FName.Split(" ") | Select-Object -First 2 | Select-Object -Last 1).substring(0,1)
And now we get:
 So then we put this all together and update our Email string…
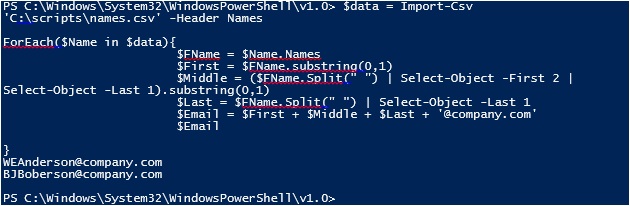 Success! Now we can start issuing emails from that list that HR sent us without having to do any manual formatting. And we also reinforce the lesson that everything, including strings, are not fixed data; but objects that can be moved, and manipulated, through the pipe.
Have a happy holiday!
 We’ve all had a good, long time to settle into the daily routine the goes with being a Windows Server administrator or engineer. We’ve had time to learn all of the nuances behind the graphical user interface. We know where to go to get our management consoles, what commands to run to make the tweaks we need and get the things we need to get done completed. And I, like many of my counterparts, looked at Server Core when it was first introduced with Server 2008 with apprehension. Why would I leave the confines of my comfortable UI for something so stripped down? What was this BS that Microsoft was feeding us? I’m not a UNIX guy!